Saturday, June 30, 2012

More Great Nursing Dresses

I'd posted a couple months ago about dresses to wear while nursing. I hadn't tried any of them in real life, but I have found a few recently I've actually worn! They are affordable and stylish, and I'm loving that you wouldn't guess you could nurse in them unless (like me) you test that feature out in the fitting room.
This black and white one is from Target, and the dress I wore to my sister-in-laws wedding. It's very flattering because it has a tie at the waist and the fabric flows beautifully.


This navy one is from Loft. I bought it in green, and it also comes in light blue and yellow. It has a stretchy neckline so it easily pulls down. Loft also sells a shirt with the same basic style.

As I find more great dresses, I'll keep you posted!

Wednesday, June 27, 2012

In Process

You might have noticed that all my colors and patterns don't match right now. I'm trying out some ideas for a new blog design, but right now I'm still in process. Thanks for being patient with the mismatched look, and check back soon for the finished design!

Monday, June 25, 2012

Baby Bow Tie and Suspenders

For my sister-in-law's wedding, I knew I wanted to make Eli something adorable to wear. When I found out the groomsmen (Ben included) were wearing suspenders and the ring bearer would be in a bow tie, I just had to do a bow tie and suspenders for Eli. I got a few ideas from Make It and Love It, and then made it my own. Here's how to create one for your little man:

Supplies: (sized for 0-3 months)
  • 1/4 yard main fabric 
  • remnant of accent fabric (a fat quarter would be more than enough)
  • 2 coordinating buttons
  • Needle and thread
All seams are 1/4".

Here are the fabrics I chose. They're both 100% cotton, which is what I would recommend.


//Suspenders//
Cut two 20 inch x 2 inch strips for the suspenders. (For a bigger size, you could do 2 1/2 or 3 inches.) Fold each strip in half longways, right sides together, and sew down the long side. Turn inside out and press, making the seam at the center back. Fold under one short edge on each strip and sew closed.


Cross suspenders in the back and sew a diamond shape to attach them to each other. You want the diamond to be in the middle of the back. I found the easiest way to to do this was to try the suspenders on Eli and pin them where it looked the best.

While I was figuring out where to cross the suspenders, I also measured how long they needed to be and trimmed them accordingly. This is where you can customize them to the size of your own little man. Sew on buttons if you wish, and then move on to the bowtie!


//Bow Tie//
Using your main fabric, cut two 3 1/2 inch x 2 1/2 inch squares. Then cut two 2 3/4 inch x 2 inch squares of the accent fabric. 
With right sides together, sew around all four sides, leaving a 1-2 inch opening on one side. Turn right side out. Press and sew opening closed. Stack your two rectangles of fabric as shown in the picture.
Using your main fabric, cut a 1/2 inch x 3 inch piece. Fold in half, then fold edges in so that you have a strip with the seams encased. Sew along the long edge. You could also use a 1/4 inch ribbon if you prefer. Use the thin strip to wrap around your two stacked rectangles. Pull the strip tight, then hand sew the strip in the back.
//Finishing//
For a little guy, I found it easiest to sew his suspenders to the pants. If you prefer, you can buy alligator clips or use velcro. To sew on, slip the back ends inside the pants and hand stitch to the waistband. In the front, keep the ends out and sew to the waistband. I also sewed the bow tie to his shirt. Velcro or a snap would be another option.


And there you have it! Dress your little man up and take lots of pictures!

Thursday, June 21, 2012

The Wedding!

The wedding was beautiful! The bride was stunning and we all had such a good time. Here’s a few great… and interesting… highlights of the day.

Awkward:
- The drum line that played in the background during the whole ceremony.
- Ben’s grandpa who kept asking me when a good time was to take pictures during the ceremony.
- The girl in the long white dress that was not the bride.
- The bride's uncle who came up as the families were exiting to tell her grandparents they had picked up their name cards.
- Ben and I dancing. We're not very good at it. We have a lot of fun though!

Wonderful:
- The bride, of course! She looked incredible.
- The grey suits with the yellow bridesmaid dresses.
- The father-daughter dance. My father-in-law took dance lessons with my sister-in-law and their dance was so sweet.
- The mother-son dance. I barely know the groom, and I just met his mom, but as I stood there holding Eli I couldn't keep the tears in.
- Eli in his bow tie and suspenders. He looked pretty adorable.
- Being at the wedding with my love. I always fall more in love with him when they talk about love and marriage during the ceremony.

Pictures will be coming soon!

Monday, June 18, 2012

Father's Day and Wedding Week


Happy first Father's Day to the most amazing man I know! I love you my dear.

In other news, Ben's sister is getting married on Wednesday, so we are in full wedding mode this week! Over the weekend I got to attend the bachelorette party, and then yesterday we met the groom's family. I've got some flower girl dresses to alter and a few other things to do before Wednesday. It's going to be an exciting week!

Wednesday, June 13, 2012

Wednesdays on the Homefront

Cooking: Last night I baked zucchini bread for Ben. Just one problem: we didn't have any eggs! I've found though, that I can substitute ingredients for the eggs sometimes and it works really well. Just combine 1 tsp baking powder, 1 1/2 T water and  1 1/2 T oil. I wouldn't recommend it for more than one to two eggs, though. Click here for more egg substitutions.
   
Cleaning: I've discovered that if I get up about a half hour before Eli does in the morning, I get so much done! I think that may be my little quiet time to clean the house and enjoy some silence. Now if I could just get to bed early enough so that I wake up when I need to!
   
Creating: My friend Joy came over last week and we both got a lot of sewing done. I finished quite a few things for Eli. I'm so proud of myself! Look for posts coming soon with the pictures. Then over the weekend, Joy and Lacey both came over and we worked on our blogs! I'm so excited to blog with them and chronicle our adventures.

Loving: Eli's smile is one of my very favorite things. When his eyes light up and he gives me that giant, open mouthed smile I fall in love. He's figured this out too, and tries to use that smile to get out of going to bed. Sometimes it works too. 
   
Living: Ben and I have been going through Real Marriage by Mark and Grace Driscoll with our small group. The book has been really good, but the last chapter was incredible. Mark and Grace encourage each couple to go through their life, defining priorities, setting goals and dreaming together. Ben and I are planning to start going through the extensive list of questions the book offers and start really nailing down what our life together looks like.
   
Learning: I've always struggled to stand up for myself in my life, particularly in close relationships. Since Eli was born, this has become an issue again, but I am finding a new sense of strength. As a mother, I have a deep knowledge that I must protect and guard my family. This has allowed me to begin creating some healthy boundaries in my life. The process is difficult, but I am learning!

Monday, June 11, 2012

Summer Swaddle Blanket

One of the best pieces of advice we've received since having a baby is to swaddle him when he sleeps or is fussy. Swaddling Eli works miracles! He goes from a screaming baby to a calm sleeper in minutes most times. We've found, though, that basic receiving blankets are just too small for a good swaddle. At one of my baby showers, my cousin Chelsea of Pursuing the Calling gave me our favorite flannel swaddle blanket. Now that the weather is getting warmer, though, Eli is getting a little hot in the blanket. I pinned a tutorial for gauzy swaddle blankets from Dana Made It, and used that for the basis of my blanket.

Supplies:
1 yard of cotton gauze (I bought mine at Joanns but you can find them online too)
matching thread
scissors or a rotary cutter and mat

Here's How It Works:
Trim your fabric to be a square. I found with a yard, you only need to do a little trimming. My rotary cutter makes straight lines, but you can do the same with scissors as well.

Once your fabric is trimmed, fold over the edges 1/4 inch, and then another 1/4 inch for your hem. I have a serger, so I just serged the edges and folded them over. Because the fabric is textured, try to use your iron as little as possible to preserve the feel of the fabric. You can pin your edges to help hold your seams in place if you like.

Now just sew around all four edges and you're done! As you can see from my picture below, my edges turned out a little wavy because of the stretch of the fabric. It still looks fine, though and the stretch in the fabric makes for easy swaddling.


Swaddle your baby up and there you have it!


Saturday, June 9, 2012

Good Night, Dear Void

Sometimes I wonder about my life. I lead a small life - well, valuable, but small - and sometimes I wonder, do I do it because I like it, or because I haven't been brave? So much of what I see reminds me of something I read in a book, when shouldn't it be the other way around? I don't really want an answer. I just want to send this cosmic question out into the void. So good night, dear void.
- Kathleen Kelly, You've Got Mail


I feel so much like Kathleen sometimes. My life is valuable, but small. I spend my days at home. The only lives I really influence anymore are those of my husband and son. I used to dream such big dreams. And then life happened. I love my life, but sometimes I wonder if there is something greater. If my battle scars (aka stretch marks) and late nights are worth something. I know they are. I know it in a very deep place. It's just those shallow places that wonder what it would be like to have a career and money and maybe even a house. Someday we'll be there. Tonight, well, tonight I have two guys in my life who I get to love. One who loved me enough to marry me, baggage and all, and the other one who lights up with a smile when I am near him and relies on me for everything. Life is good.

He tends His flock like a shepherd: He gathers the lambs in His arms and carries them close to His heart; He gently leads those that have young. Isaiah 40:11

Friday, June 8, 2012

Two Months Old

Eli turned two months old on May 26, so we're running a bit behind this time. We were finally able to take pictures on Saturday, and they came out so cute!


Eli will be 11 weeks on Monday and is growing so quickly. We have officially packed away all the size Newborn clothes and moved on to size 1 diapers. It was a little sad boxing up all those tiny clothes. I wouldn't trade him growing older though. It seems every week he is becoming more responsive and alert.


This past month, he began smiling and is now at the point where he will respond to you with smiles and coos when you talk to him. He loves to lay on the floor and watch what's going on around him. He also loves going out and watching the world from his carseat. He is so curious!


Over the past few weeks, we've dealt with reflux and a cold, so he and I have not been sleeping as well. I was hopeful he'd be sleeping through the night by now, but maybe by next month. He's finally feeling better, eating and gaining weight again so we are on the mend!


I'm looking forward to this coming month as he becomes even more responsive and hopefully begins to laugh! Although we've had some challenges, this has been a really good month. I may still be sleep deprived, but I feel like I'm finally getting into a rhythm with Eli at home. Being a stay-at-home mom is going to be a good thing.

All pictures copyright Firebird Imaging. Images may not be reproduced for any purpose.

Tuesday, June 5, 2012

New Life for Old T-Shirts

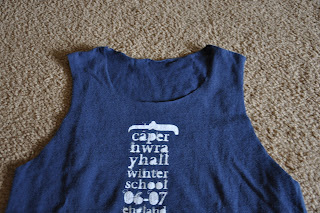
I have quite a few old t-shirts from different events of the past several years. The sentimental part of me just can't bear to get rid of them, but I don't really wear t-shirts unless I'm doing heavy duty cleaning or really don't feel good. I found a tutorial on Pinterest based on this post by Dollars, Sense & More and decided to give it a try. It takes an old t-shirt and turns it into a cute tank top for work outs or days around the house. I'm really happy with how it turned out!

 Step One:
Find an old t-shirt. Pretty simple! My only suggestion would be to choose one that's a little big on you. I made mine out of a size small (I typically wear small/x-small) and I think a medium would have given me a little more room.
Step Two:
Cut around the neck, staying close to the original neck seam.


 Step Three:
Cut around both sleeves, again sticking close to the seam.

 Step Four:
 Cut the front of the neck again, making it into a U shape with about 1 1/2 inches coming off at the center point. You should end up with a cut piece of fabric that looks like a smiley face. Also cut another 1 1/2-2 inches off the sleeves.
Step Five:
Cut a rectangle from one of the discarded sleeve pieces that is about 8 inches by 2 inches. Pull on the long ends until it rolls.


 Step Six:
Tie the strip of fabric around the back part of the t-shirt. Wrap it twice, double knot it, and tuck in the ends.
And there you have it! Here's a front view. Sorry it's blurry!
Here's a back view (kind of). It's hard to take pictures of yourself using a mirror! As you can see, I'm wearing a tank underneath, but this would also be cute with a sports bra.

Happy Tuesday!

Love, Eli